Monday, April 2, 2012

Fresh Sewing Day - Small Blog Meet


I discovered a couple of wonderful Link Ups and am excited to blog about them.  Figuring out how to grab a button requires more than one cup of coffee this morning, so for now I'm just going suggest you visit Lily's Quilts and learn all about it.

Later today I'll edit this post and fill you in more.... in the mean time, check out the March Madness mosaic and let me know which project catches your eye.

What did you do in March that stands out? Make a comment and let me know!

Fresh Sewing Day - March Madness


Saturday, March 31, 2012

Tassels Quilt Tutorial

How to make a Tassels Quilt
Block: 12 1/2"x 12 1/2"
(finished size 12"x 12" square once sewn into the quilt)
all seams 1/4", all seams ironed open

 For a scrappy look, you will need eight rectangles cut 4"x7" of similar value for the body (Blue) and four squares cut 4"x 4" of the contrasting color (Yellow) for the tips. To get the best gradient effect try to pair a dark/medium value body with a light tip OR pair a light body with a darker tip.
(If your scrap selection is not that extensive, you can repeat the same body twice and place them so that they are not directly next to one another within the block.)

Layout in desired order
Arrange them in the desired order. Alternating blocks become A and B as shown.  I like to take a picture with my camera to refer to later when assembling them.
 
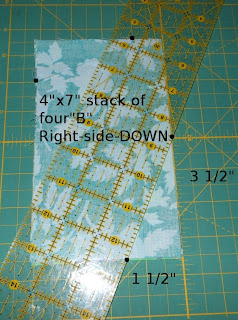
Pull just the A blocks and place them FACE UP on the cutting board. Using the cutting board lines, locate from the corner 1 1/2" and 3 1/2" to position your Ruler for the first cut and then the second cut as shown with the arrows.
First Cut A stack FACE UP
Second Cut A stack FACE UP
Second cut B stack (FACE DOWN)
Pull the B blocks and place them Right-Side-Down then repeat what you have just done (the picture on the left shows the first cut already done and the ruler in place for the second cut).
BE SURE 
that all the rectangles in stack A are Right-Side-Up & stack B are Right-Side-Down. This will result in the necessary mirror image & correct orientation.


Cutting the TIPS
four 4" squares for TIPS
Stack your 4"x4" squares.  Cut in the center at 2", then diagonally as shown. This will make a set of eight TIPS for A & eight for TIPS B.
NOTE: the tips are easily mistaken for one another so pay attention to be sure they are correct before attaching to the body A & B.   

pre-sew Mock Up - it should look like this
It is helpful to set the tips face up in place to get a visual of what they will look like and to be sure that you have picked up the right type. The extra Mock Up step is worth it. Once verified, flip them over into position, fabrics right sides together to sew them on. You can see how the ends hang off a bit (click to enlarge the photo to see a close up). The placement isn't super critical because they are trimmed down later, but it should be close.
Flip Right Sides Together to sew
Sew TIPS 1/4" seam to the BODY

Chain piecing is great, however...if it's your first time with this technique... it may be a good idea to make the first block all the way from start to trim to be sure the tip placement is on target.

I attached all tips to one side (took a picture of it on the design wall to show you-see below), snipped them apart and chain stitched the other side.


TIPS attached to the first set


Four A & Four B with TIPS sewn on
Blocks with seams open ready to trim

Iron all seams open

It's OK that the tips look crooked and the blocks are askew.  They will not be shaped like true rectangles at this stage but as long as the width can be trimmed to 3 1/2" and the height 6 1/2" you're good. 

Notice in the picture below that I've positioned the ruler to trim the right hand side but am also checking to be sure there is fabric under the 3 1/2" line of the ruler on the left hand side.


TRIM TIME: a 6 1/2" ruler is ideal, but any will work.
Trim each block to 3 1/2"x 6 1/2" by cutting about the same amount off all four sides.  Doing so helps the TIPS remain a similar size.  

Underside Trimmed
Next, lay them back in the original placement order and sew them together. Top row and then the bottom. Iron open seems. Sew the final seam joining the top and bottom row, matching the seams to create the finished 12 1/2" x 12 1/2" Tassels Block.

Make sure the horizontal spike is in the lower left hand corner when doing the 8 rectangle sub-unit layout to ensure proper position for secondary star pattern. refer above to the original photo showing ABAB top row and BABA bottom row.


One 12 1/2" x 12 1/2" square Tassels Block Complete
The completed block is in the upper left of the picture below and I've placed various partially sewn parts on the design wall to illustrate how the secondary tassels appear once multiple blocks are together.  The final quilt will most likely have the darks merging into the lights more gradually than this - but  I wanted to illustrate where it's headed with the parts that I have made so far.

Continue to make blocks until you have the desired number for the size of quilt you are making. Join the blocks in rows, columns and quilt as you like.

This is my very first time to write a tutorial so please let me know immediately if you see any errors or have any questions.  Thanks so much ! Karen

Update:  the lovely ladies of Friends+Fabric=A Modern Stash Bee (F+F=AMS) created blocks for me and I sewed them together along with a few more that I made.  It was the perfect project for our first annual Modern Quilt Retreat.
Tassels top finished at our MQG Retreat Nov 2012
Completed Quilt February 2013
Close Up of Finished Tassels
Back of Tassels
The Tassels Block was inspired by my Crush Quilt that I made using Dancing Twilight Pattern by Cheryl Malkowski which uses a different technique to create and the blocks are also a different proportion.

Friday, March 30, 2012

Sharing from flickr test...

8blocks4x7layout by capitolaquilter
8blocks4x7layout, a photo by capitolaquilter on Flickr.
sharing a picture from flickr test - one - two -three....


You're probably wondering what the heck is up with 3 posts in one day for goodness sakes.

I've been saving my blog pics to the desktop and inserting them in the post which is kind of a pain since I really like to import from my camera direct to flickr and edit in picnik  (while I still can).

So this is a test... and only a test... to see what the heck the "share" button does.  You all are probably snickering at what I novice I am right about now. I'm learning and this is a good trick.  Yeah, it seems to have worked.

One final test run before I post the Tassels tutorial to be sure the directions actually work. I'm sure you can appreciate that!

Evolution of Tiger's Eye

Having only made two Log Cabin quilts in my life - both of which I consider favorites - I was excited when Mandy chose the pattern for her swap row.  Here's a picture of the squares on the design wall and auditioning for placement on the top.

Using the diagonal lines on my cutting board and the lines on my ruler, I turned them on point and cut the tips off two sides.  Then I cut 7" squares of cream in half to create the setting triangle. Once squared up, I sashed with a 2" strip, added a 5" piece of Tula Pink background Mandy had provided to each end and attached the row.
Before they became Tiger's Eyes
The rich pallet and log cabin theme with alternating large/small & 4/5 per row is giving this top such a cohesive design.
The Need for Negative Space
Even though I really like the way the blocks look on their own, if I had sewn them in as squares they wouldn't have supported the overall look of the top and would've given it a bottom heavy appearance. They measured 12x12 but seemed so much larger and rigid. I'm happy with the final result (see earlier post) and glad that Mandy is too.
 
My First Log Cabin

My Second Log Cabin

Tiger's Eye Log Cabin

I added the bottom row "Tiger's Eye" log cabin
I've been sitting on this swap for much too long - the hearts were added by Jan on Valentine's Day and then she mailed the top to me.  So this week I got my act together and created what I call Tiger's Eye Log Cabin for Mandy's Row Robin quilt.  The other blocks were each made of a single fabric, and I decided to mix batik and floral instead. The number of combinations that I auditioned was ridiculous, my stash buckets got a work out. I was going for continuity but wanted the subtle jagged center to be visible.

Around the Bend and Across the Pond! is my first swap of this nature and I'm really enjoying the process and variety.  There are six seriously talented quilters in our group making it fun to push my creative limits to try and keep up.

I'm also finding that naming blocks and quilts is really fun.  Jenny even credited me with naming Urban Deco, an awesome block with a tutorial at Sew Kind of Wonderful.

This one reminded me of a Tiger's Eye ring I had in High School and I love the meaning of the stone: Patience, Focus & Determination. Three traits that come in handy with quilting I'm sure you'll agree.  Check out Blades of Grass for Moni and the row I made for Jan using my Phillip Jacobs second-hand scraps. 

Susan posted that she's added the third row to mine and will be uploading pictures soon - can't wait!  They are nearing the half-way point and really taking shape.  Next up is our fearless leader Dana's row with whimsy and solids - time to break out some Heather Ross!

My part is done and I'll be shipping Mandy's to to Jacqueline. Linked to Finish it Up Friday Crazy Mom Quilts 

Tuesday, March 27, 2012

Starburst Double Take: aka Tassels

12.5x 12.5 Starburst Double Take
April is my month to choose a block for Friends + Fabric = AMSB (a modern swap bee) and I thought I had it nailed. I'd narrowed it down, made my test blocks, even posted a discussion thread - but classic Karen - I'm changing it up last minute.

The pattern is inspired by my Crush Quilt which was made using Cheryl Malkowski Dancing Twilight Pattern.

It's really only the layout that is different from my first prototype but I also decided that winging the placement of the triangles might be tricky for some and that trimming off the excess each time was less time efficient than simply stacking and cutting ahead of time. I promised a template option - don't know why - I hate templates, they make me cringe. 

Hope to have a step by step posting in the next few days. Seems tempting to do an April Fools joke and ask for a wildly difficult block, but anyone who knows me can testify how I just don't get the appeal of practical jokes.  Besides, these ladies are way too fabulous and bright to pull a fast one on.  Check out some blocks I've made so far: Crazy Crayon Box for Jen, Half Rectangle Triangle for Maria and Diamond Log Cabin for Linda.  I'd make them all again. They were great choices.

I named it Starburst Double Take since it took a second go at it to get it right and also for the double burst instead of the original single one.  Looking at it now I think it could be called "Tassels" hheee hheee.... if I was naughty.