Wednesday, April 20, 2016

March BeeSewcial: Repeated Triangles in Blue

For our April blocks Marci asked us to keep it simple, play and have fun.  She did a great job outlining the challenge - a task I find very challenging. Read about it here: Time To Play .  

When she said to not overthink it I kind of chuckled and wondered if that part was written for me. The only picky thing was to make them 12.5" or 6.5" square which doesn't sound that unusual but I have become accustom to having little or no size restraint with this group.

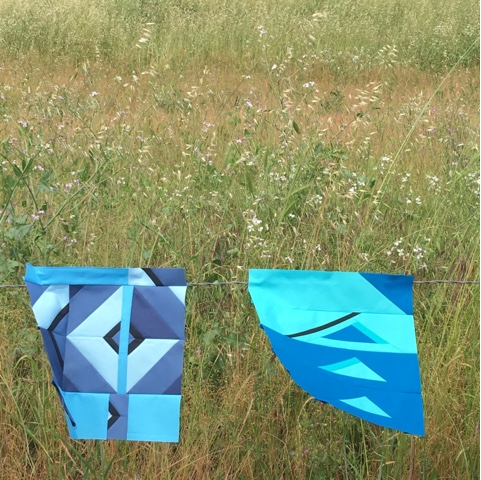
BeeSewcial April blocks
Having the palette open to all shades of blue was fantastic.  They deserved a glamour shot so I stuck them to a wire fence - yes with blue painters tape. 
Block One 12.5" square
For the first block I used my go to ocean blues leaning towards aquas and included one strategically placed black accent.   Negative space was consciously reserved.   The design was based on this QDAD (quilt design a day)
QDAD design
The stacking element and angles are a pretty direct interpretation. This was created to be a quilt rather than block and I think they would each work well for both.   Our beemate Stephanie scaled her 12" block up to 96", gasp.
Process 
The construction of the triangles tossed around in my head for weeks. Because there are so many different ways to get the same end result and I'm all about the process- I chose a method that I had enjoyed while sewing my OIB quilt (Old Italian Block) and missed doing. Anita Grossman Solomon'sbook and crafsty class are clever.

OIB Process Picture
Look!! I even took the time to estimate my target size and sketched which was a huge "extra" step for me.
Quilt math-ish
Of course I deviated from the plan but that's to be expected. The lower left is another idea I had for block two that I rather like and didn't materialize.    Instead - this happened:

Block Two 12.5" square

Sometimes when I work into the wee hours I get a second wind and the creative juices flow.  It's also a zone that tends towards the more abstract than focused.  I was relieved that Marci gave it the thumbs up and felt the partial repeats followed her outline. 

Experimenting with a Strip Set
Experimenting with "what ifs" is encouraged by this group.  The variety of blue for block two is more along the denim family - a nod to my February challenge.  I made a strip set from a  kona jelly roll and added slivers from trimming I'd kept.  
 
The goal was to have repetition without boring me silly and I wanted to try out my new bloc-loc ruler.  I'd have to score my trial as a fail for this project at least since I spent most of my energy redoing the random selections created to get the parts I wanted. 
Building Out
Building out to the target size and maximizing the shapes to fool the eye in the areas that were less obviously triangles took some fiddling.   That part of the process is fun, having things finally fall into place even when it takes a bit of pushing. 

It's a guy thing

I'll end with a couple more scenic shots.   Marci is making a quilt for her hubby - ssshhh, don't tell mine, he'll wonder why he's not getting one!  
Barely Breazy

Sunday, April 10, 2016

2016 FAL Q2 Goal: Lucky Seven

Lucky Seven 


2016 FAL Q2 goals
Here they are.  My Lucky Seven 2016 FAL Q2 Goals.  Hoping for a better yeild of finishes than my Q1 Bakers Dozen.  

  • Left column top to bottom:  
Composition in Color from Maria Shell workshop.  On the list for no other reason other than I really do love this one.
A Little Fan Dance  from Anna Maria Horner workshop. Another mini which should make it doable.  The center fabric choice will make or break the design and I find it a fun challenge to audition my stash.
Delectable Mountain  for my son.  If you've followed my blog for any length of time this one needs no introduction.  Tardy doesn't begin to describe things.
  • Center column top to bottom:
KingClam from Latifah Saafir workshop . I should rename this quilt Hurry Up and Wait.  The original goal was to have it on my bed Winter 2014 and I really thought would.   I was on a roll, aka obsessed with it at the time.  The top was done in 8 days.  Maybe our guild will throw a marathon 12 hour sew day again! 
Stretch: Let's Get Comfortable from 2016 BeeSewcial.  Not all of the blocks from my bee mates are shown here but they are in hand and ready to be stitched together.  
  • Right column top to bottom 
Reflection from 2015 BeeSewcial.   These need to become a quilt and in a timely manner.   Not only because that's the promise I made but because I am so excited about every single one of them.  Getting caught up in their individual awesomeness has been a design issue for me along with the intimidation to do them justice.  I've played with the composition on several occasions and have been stumped.  I think I'm finally ready to let go of those stumbling blocks. Wish me luck!
Center of Attention from Jill Shumacher workshop FMQing practice block cute enough to make into a pillow. 
This is such a new WIP that I only shared on IG.  Learning FMQ slow and steady following the lines as well as stitch in the ditch with monofilament- all very foreign concepts. 
14" squares
Hands on and hanging in while attempting the dreaded diagonal.  I'm also trying it with lotion instead of gloves and without my super slider just to give the teacher's recommendations a go.  
thumb tucked in

Here are my practice pieces and an end of day selfie with my table mate Joannie 
feeling successful


Linky Party is OPEN won't you join the fun?  Even if you decide not to post your goals, be sure to check out and cheer on those who do.   


Hop around the world with the co-hosts by visiting their blogs and follow them on Instagram using the links below:

Sunday, April 3, 2016

Layers - March Beesewcial


Tide Pools


14.5"x15" Layers -March BeeSewcial 
Here are the two finished blocks that I made for Hilary's "Layers" theme for March BeeSewcial.  Yes, they were technically created mostly in April but aside from that little fact, I'm really thrilled with everything else about them.

When she released the challenge details (posted here) I immediately thought of Tide Pools and knew I wanted to use that as my improv with intent spark.    It also made me want to go down to Natural Bridges to see some in real life because that hasn't happened in years.

Woven

16"x13" Layers - March BeeSewcial
The other thought that came to mind was the workshop with Maria Shell and the Maximalist block that I made for Leanne (pictured below, blogged here).  Replicating it would be - insane - but I do think that it has a very layered, woven look and wanted to capture the essence of that again. 

Maximalist Block Nov 2015
Don't they look related?

Color, Lighting and Technique

Sometimes when I read the challenge I need to let it percolate but this time I wanted to jump right in.   For consistency,  Hilary listed names of specific solids and asked that we use them or similar.  Without a Kona color card and because my stash is a big heaping mess, I picked up School Bus and Flame during break at the March guild meeting which happened to be on sale to members (thank you Hart's Fabric).

Kona Solids
Can I just say that the shift in lighting was THE worse for messing with my mind and composition decisions with these blocks.

Crazy Variation of the SAME thing
There were moments when the same two fabrics next to one another went from being too high contrast to indistinguishably blending in.

Pretty true to color Stash Pull

I pulled stash based on the list she had provided of the peeling paint image by Richman and from looking at the blocks that were made and posted on IG.

The Theme 
Because life somehow got in the way all of March, I didn't get a chance to really sink my teeth in this project until the very, very end of the month.  The upside was that I got to take part in #fridaynightsewalong on April 1st which is always fun and encouraging.

Cropping 
Here is the final crop of my first block.  Don't you love how I had to push aside to make a space on the cutting table large enough to fit the ruler?   Improv is not a neat and tidy process for me.   

Add caption
I made this QDAD directly influenced by Hillary's work and rather than try and bring it to life (which I hope to do as an entire quilt) I printed it out for additional inspiration and cut freehand.


Freehand cut 
You should definitely read this Curves Ahead post by Stephanie if you have an interest in trying the freezer-paper-less technique of the 6 minute circle.    She does a great job of taking you step by step through an illustrated tutorial of sorts of her process.    I wish I was that together to share mine with you here.

The Roxanne's glue that I bought and not used at Glamp came out of the package and made its debut for this block.   I have used a glue stick and a paint brush with Elmers like on the block shown below made for Di from April 2015 "Circle/Ovals/Curves" theme (blogged here) 


It's hard for me to switch gears or have a lot of props when I'm in the improv zone plus keeping track of where I keep the "other stuff" that I use only occasionally is also challenge.   There are extreme shapes that take extreme measures and therefore worth the effort. 

Carefully clipping the seams as Stephanie does was the hardest and most time consuming step and bothered my hand.  I even tried several types of scissors.

Glorious Glue
When it was time to clip the second circle I was warmed up but it still felt awkward and I was annoyed enough to remember why I hadn't done it for a year.

Auditioning 
The first block didn't include the optional bit of black and I wanted this one to.  Auditioning (late night lighting) I crowd sourced opinions on IG about it as well as using blue again in the lower segment.  I was concerned that it might distract from the focal blue areas but really wanted it there.

Initial curve
Next step, I eyeballed the target shape from the section and cut it with my regular rotary.  Dreading the clipping task it dawned on me to use my pinking blade.  It was a "what if" moment that paid off big time.  It was so easy to use my scissors to snip at each (or most) of the indents.
Pinking
Once I pressed the seam allowance over I could determine the few areas that needed to be snipped away and took care of those.  This was so much less stressful for my hand and makes the technique doable.
Building out The Gap
This shot shows just how much "one thing leads to another" applies to the way I approach improv.  The placement I decided on had gaps in the fabric below - which is a no no.  Building out as needed (shown above) gave the final results (shown below).
Final Joint Detail
If you look back at the first photo of the entire block, you'll see that I added a rectangle-ish shape in the upper right of the dark grey to tie in the one at the bottom.  The other repeated shape isn't as obvious but the large solid blue in the bottom corner should look similar to the shape of the tiny triangle-ish shape once it is sewn in.  At least that's the plan.

For those of you not in the BeeSewcial group, you can still take on the monthly challenge and see what others have shared on IG with the hashtag #inspiredbybeesewcial 

Hee, Hee, Hee 

Thanks for hanging in there with my long winded post.  To reward you for making it to the end I'll leave you with this:  a bit of accidental humor.   Taking a photo of the underbelly of the block to show the construction is something that I do often.  I was innocently compiling a mosaic of the to blocks front/back and came up with this sinister creature!

Accidental Humor
And on that note - happy stitching.