How to make a Tassels Quilt
Block: 12 1/2"x 12 1/2"
(finished size 12"x 12" square once sewn into the quilt)
all seams 1/4", all seams ironed open
For a scrappy look, you will need eight rectangles cut 4"x7" of similar value for the body (Blue) and four squares cut 4"x 4" of the contrasting color (Yellow) for the tips. To get the best gradient effect try to pair a dark/medium value body with a light tip OR pair a light body with a darker tip.
(If your scrap selection is not that extensive, you can repeat the same body twice and place them so that they are not directly next to one another within the block.)
 |
| Layout in desired order |
Arrange them in the desired order. Alternating blocks become A and B as shown. I like to take a picture with my camera to refer to later when assembling them.
Pull
just the A blocks and place them FACE UP on the cutting board. Using the cutting board lines, locate from the corner 1 1/2" and 3 1/2" to position your Ruler for the first cut and then the second cut as shown with the arrows.
 |
| First Cut A stack FACE UP |
 |
| Second Cut A stack FACE UP |
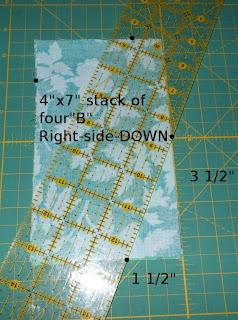 |
| Second cut B stack (FACE DOWN) |
Pull the B blocks and place them Right-Side-Down then repeat what you have just done (the picture on the left shows the first cut already done and the ruler in place for the second cut).
BE SURE
that all the rectangles in stack A are Right-Side-Up & stack B are Right-Side-Down. This will result in the necessary mirror image & correct orientation.
 |
| Cutting the TIPS |
 |
| four 4" squares for TIPS |
Stack your 4"x4" squares. Cut in the center at 2", then diagonally as shown. This will make a set of eight TIPS for A & eight for TIPS B.
NOTE: the tips are easily mistaken for one another so pay attention to be sure they are correct before attaching to the body A & B.
 |
| pre-sew Mock Up - it should look like this |
It is helpful to set the tips face up in place to get a visual of what they will look like and to be sure that you have picked up the right type. The extra Mock Up step is worth it. Once verified, flip them over into position, fabrics right sides together to sew them on. You can see how the ends hang off a bit (click to enlarge the photo to see a close up). The placement isn't super critical because they are trimmed down later, but it should be close.
 |
| Flip Right Sides Together to sew |
 |
| Sew TIPS 1/4" seam to the BODY |
Chain piecing is great, however...if it's your first time with this technique... it may be a good idea to make the first block all the way from start to trim to be sure the tip placement is on target.
I attached all tips to one side (took a picture of it on the design wall to show you-see below), snipped them apart and chain stitched the other side.
 |
| TIPS attached to the first set |
|
|
|
|
|
|
|
|
|
|
|
|
|
|
|
|
|
|
|
|
|
|
|
|
|
|
|
|
|
|
|
|
|
|
|
 |
| Four A & Four B with TIPS sewn on |
 |
| Blocks with seams open ready to trim |
Iron all seams open
It's OK that the tips look crooked and the blocks are askew. They will not be shaped like true rectangles at this stage but as long as the width can be trimmed to 3 1/2" and the height 6 1/2" you're good.
Notice in the picture below that I've positioned the ruler to trim the right hand side but am also checking to be sure there is fabric under the 3 1/2" line of the ruler on the left hand side.
TRIM TIME: a 6 1/2" ruler is ideal, but any will work.
Trim each block to 3 1/2"x 6 1/2" by cutting about the same amount off all four sides. Doing so helps the TIPS remain a similar size.
 |
| Underside Trimmed |
Next, lay them
back in the original placement order and sew them together. Top row and then the bottom. Iron open seems. Sew the final seam joining the top and bottom row, matching the seams to create the finished 12 1/2" x 12 1/2" Tassels Block.
Make sure the horizontal spike is in the lower left hand corner when doing the 8 rectangle sub-unit layout to ensure proper position for secondary star pattern. refer above to the original photo showing ABAB top row and BABA bottom row.
 |
| One 12 1/2" x 12 1/2" square Tassels Block Complete |
The completed block is in the upper left of the picture below and I've placed various partially sewn parts on the design wall to illustrate how the secondary tassels appear once multiple blocks are together. The final quilt will most likely have the darks merging into the lights more gradually than this - but I wanted to illustrate where it's headed with the parts that I have made so far.
Continue to make blocks until you have the desired number for the size of quilt you are making. Join the blocks in rows, columns and quilt as you like.
This is my very first time to write a tutorial so please let me know immediately if you see any errors or have any questions. Thanks so much ! Karen
Update: the lovely ladies of
Friends+Fabric=A Modern Stash Bee (F+F=AMS) created blocks for me and I sewed them together along with a few more that I made. It was the perfect project for our first annual Modern Quilt Retreat.
 |
| Tassels top finished at our MQG Retreat Nov 2012 |
 |
| Completed Quilt February 2013 |
 |
| Close Up of Finished Tassels |
 |
| Back of Tassels |
The Tassels Block was inspired by my
Crush Quilt that I made using Dancing Twilight Pattern by Cheryl Malkowski which uses a different technique to create and the blocks are also a different proportion.


Karen, not only did I not see any errors, but you really did a great job writing, and most of all illustrating, this tutorial! Congrats on your first (hopefully of many to come)! If anything jumps out while I'm actually working on making these blocks I'll let you know, but I don't think that will be necessary.
ReplyDeleteKaren, I think you did an excellent job explaining how to make the block. I will try it tomorrow and let you know if I have any problems, but it seems very clear. The only possible change would be to use fabrics with a little more contrast to your cutting mat so they are easier to see -- too bad I can't loan you my pink cutting mat! This will make an excellent "Sunday is for Scraps" quilt, thanks for the tute!
ReplyDeleteI love this block! IT would be a great one to ask for in my bee!!
ReplyDeletep.s. saw on the Sewing Summit flickr group that you're a first timer too!! WOOHOO!
Congrats on writing your first tutorial -- this looks great, it has a very mid-century feel to the design. I will have to carve out some time to try this! Your directions and photos seem very clear.
ReplyDeleteGreat quilt - love the clever piecing!
ReplyDeletethis is so gorgeous--thanks for the tutorial--I love how this came out...hugs,Julierose
ReplyDelete